
It’s American football season again and, as many fans will attest, there are few things more exciting than intercepting a ball thrown by the opposing team’s quarterback – it can truly be a game-changer! Similarly, utilizing JS (JavaScript) HTMX extensions to intercept responses in your web application can yield equally exciting results. By providing new inflection points in the code (i.e. capturing responses before a specific target is updated), developers can inject a variety of useful functionality that would otherwise be overly complex or convoluted to implement effectively. In this post, I will present 3 distinct examples of how responses can be intercepted and leveraged to extend HTMX/Flask interactions beyond simple attribute-based GET and POST requests and responses.
Example 1 – Error Handling
Sometimes, in football, plays break down, and it’s up to the players to handle that breakdown elegantly and intelligently. For example, a quarterback might throw the ball out of bounds if no one is available for a pass to avoid taking a sack. Likewise, in a web application, when something breaks down on the server or in the code during a request, it will likely elicit an error in the response that should be gracefully handled. To do this, we can simply add a JS listener utilizing the htmx:afterRequest event. Per the documentation:
This event is triggered after an AJAX request has finished, either in the case of a successful request (although one that may have returned a remote error code such as a 404) or in a network error situation
Combined with the failed event detail, we can determine whether the response was successful or not. If not, we can implement code to handle the failure accordingly. In the basic example below, an alert is displayed if a failure occurs; however, this could easily be replaced with more robust error handling:
1. document.addEventListener('htmx:afterRequest', event => {
2.     if(event.detail.failed){
3.         alert("Error - Please contact an administrator")
4.     }
5. })
Example 2 – HTMX Request Chaining
Sometimes in football, a more complex offensive play can have several “steps” as the team attempts to move the ball forward. An example of this would be something like a “reverse” where the quarterback hands the ball off to a player running in one direction, who then, in turn, hands the ball off to another player running in the opposite direction. Similarly, there are situations in which a developer may need to “chain” requests, where upon reception of a response from one request, another request is subsequently issued (i.e. the application flow is handed off between distinct endpoints). An example we recently faced was the need to utilize an existing Flask route without modifying the endpoint or its response but ultimately pass back a custom response targeting parts of the UI (User Interface) for refresh. After making the initial HTMX request, we could intercept the response from that first endpoint and then kick off a subsequent ajax request to a secondary endpoint that would target a refresh of the necessary UI components. Below is a generic example illustrating how this can be accomplished using HTMX custom extensions.
Part 1 (Initial Request)
In the front-end code, we use standard HTMX attributes to post a request to the initial endpoint:

The first thing to note is that the hx-swap attribute is set to ‘none’. This ensures that the response content is not appended to the DOM (Document Object Model). Secondly, we have included the hx-ext attribute to name our custom HTMX extension. This is used to identify the extension definition in our JS code.
Part 2 (Interception and Secondary Request)
Below is the JS definition of the HTMX extension that we created. Again, we were able to leverage an HTMX event to intercept the response from the first endpoint, parse it and then execute another HTMX request to the secondary endpoint. For this particular piece of code, we used the htmx:afterOnLoad event to intercept the response. Per the documentation:
This event is triggered after an AJAX onload has finished. Note that this does not mean that the content has been swapped or settled yet, only that the request has finished.
Since we don’t need or want to update the DOM with the response from the first request, we can intercept it using this event type.
In the extension definition example below, we have an onEvent listener listening for the htmx:afterOnLoad event. When that is returned successfully, we issue an HTMX ajax call to the second endpoint targeting the UI components to be refreshed (in this case it’s the #search-results element) effectively chaining the two requests back-to-back.
1. htmx.defineExtension('htmx-project-reload', {
 2.     onEvent: function (name, evt) {
 3.         if(name == 'htmx:afterOnLoad'){
 4.             const status = evt.detail.xhr.status;
 5.             if(status == 200){
 6.                 htmx.ajax('POST', '/second_endpoint',
 7.                     {target: '#search-results', indicator: '#loading-message'}
 8.                 )
 9.             }
10.         }
11.         return true;
12.     }
13. })
Example 3 – File Download
When a football coach finds that a particular type of play isn’t working or isn’t appropriate for the current down and distance, they might try using a different type of play. For example, if running the ball isn’t working well, they may choose to try and pass the ball through the air instead, particularly if they have a large distance still to cover since it’s better suited for that situation. In the case of providing file downloads to users, there are, of course, different ways to accomplish this. One of the easiest is to simply provide a link to the file location using basic HTML (Flask example below):

In many cases, this implementation may be totally adequate. However, what if you want to display an indicator while the report is generating or provide improved error handling if report generation fails? In this case, you may want to switch up the implementation and leverage HTMX attributes and events to handle the file download since it is better suited for those types of situations. The example below is based off a great post by Martin Mohnhaupt over on Medium.com where he does just that, albeit with a few of our own minor tweaks.
Part 1 (Initial Request)
First, the button is created on the front-end using attributes to define the HTMX post configuration:
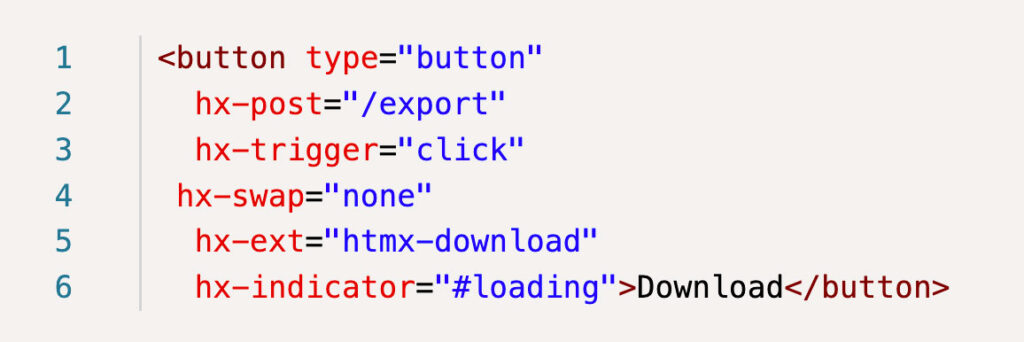
Like our last example, we have set the hx-swap attribute to “none” so that the response does not impact the DOM in any way. The hx-ext is also set to identify the name of the extension in our JS definition code and lastly, we have added the hx-indicator to identify the “loading” element in our UI that will be displayed as the report generates.
Also of note, the “/export” endpoint generates the report content and then sends the bytes using an in-memory bytes buffer to the client as part of the response:
1. with open("report.csv", "rb") as file:
2.     file_contents = file.read()
3.     return send_file(BytesIO(file_contents), as_attachment=True, download_name="report.csv")
Part 2 (Interception and file download)
Once again, when the response is sent, we intercept it using the htmx:afterOnLoad event in our JS HTMX extension definition. Assuming that the response is successful, the headers and content are parsed to retrieve the necessary data for download including the filename and MIME type. Next, a hidden link element is created and given attributes populated with the parsed information. To ensure that there are no issues with the href content, we encode the response payload binary data to base64 using the built in JS btoa function. Lastly, the newly created link element is clicked programmatically, prompting the download in the client and then removed from the DOM since it is no longer needed for this specific download.
1. htmx.defineExtension('htmx-download', {
 2.     onEvent: function (name, evt) {
 3.         if(name == 'htmx:afterOnLoad'){
 4.             const status = evt.detail.xhr.status;
 5.             if(status == 200){
 6.                 const response = evt.detail.xhr.response;
 7.                 const headers = get_headers(evt.detail.xhr);
 8.                 const filename = headers['content-disposition'].split('=')[1];
 9.                 const mimetype = headers['content-type'];
10.
11.                 const link = document.createElement("a");
12.                 link.style.display = "none";
13.                 link.href = `data:${mimetype};base64,${btoa(response)}`;
14.                 link.download = filename;
15.
16.                 document.body.appendChild(link);
17.                 link.click();
18.
19.                 setTimeout(()=>{
20.                     URL.revokeObjectURL(link.href);
21.                     link.parentNode.removeChild(link);
22.                 }, 100);
23.             }
24.         }
25.         return true;
26.     }
27. })
The get_headers() function called in the above code parses the header contents into a JavaScript object and, per Martin Mohnhaupt’s post, is inspired by the developer.mozilla.org code.
I have included his implementation below for convenience:
1. const get_headers = (xhr) => {
 2.     // Get the raw header string
 3.     const headers = xhr.getAllResponseHeaders();
 4.     // Convert the header string into an arrayof individual headers
 5.     const arr = headers.trim().split(/[\r\n]+/);
 6.     // Create a map of header names to values
 7.     const headerMap = {};
 8.     arr.forEach((line) => {
 9.         const parts = line.split(": ");
10.         const header = parts.shift();
11.         const value = parts.join(": ");
12.         headerMap[header] = value;
13.     });
14.     return headerMap;
15. }
Conclusion
As evidenced by these three very different examples, using HTMX events to intercept and parse responses can prove to be a powerful tool and provide for some exciting possibilities. From creating more robust error handling to extending built-in functionality, this concept can help make sure your next HTMX-enabled web application is a touchdown!
Loved the article? Hated it? Didn’t even read it?
We’d love to hear from you.