
I used to work as a motion graphics artist.
So, for a long time, I’ve wanted to delve into SVG animation to see what it’s like combining my love of the web with my love for mograph. And last week, I got my chance.
For one of our clients, we needed to keep the user occupied while an external API returned some data. Obviously, the simple solution was to show a loading page with a spinner that looped until the API request completed. But rather than just grabbing a free CSS spinner from loading.io, I decided to use this as an opportunity to create a custom loading spinner made from their logo using SVG and GSAP. You can check it out in this codepen below:
See the Pen
MagazineJukebox Logo Animation by Drew (@itsjustdrewit)
on CodePen.
You can look through the source code to see how it works, but in the rest of this article, I’ll show you how to create this much simpler spinner out of the Simple Thread logo. Let’s get started.
See the Pen
Simple Thread Logo Animation with GSAP by Drew (@itsjustdrewit)
on CodePen.
Wait…what is GSAP and what are SVGs?
The GreenSock Animation Platform (or GSAP) is a Javascript library that enables us to make programmatic animations of HTML elements. It’s incredibly powerful on its own, but gets even more powerful when we combine it with SVGs.
Scalable Vector Graphics (SVGs) are ways of delivering illustrated graphics where instead of distributing a file containing a pixel map – we tell the computer how to draw the picture on the fly using math. It’s an amazing way of creating graphics for the web because by nature of the medium, it’s scalable to any screen size, dimension, etc. without any loss in quality. And because it’s displayed in the DOM, we can use GSAP to bring SVGs to life and create scalable, web-based motion graphics. It’s magic.
Planning: the important boring work.
If you’re like me, your first instinct might be to grab your logo, jump into GSAP, and start trying to hack something together. However, I strongly recommend taking 15 minutes to sit down with pencil and paper and plan your animation. This is best practice when you’re doing any kind of animation and because SVG and GSAP are a little more “bare-metal” of a process, it’s even more true here.
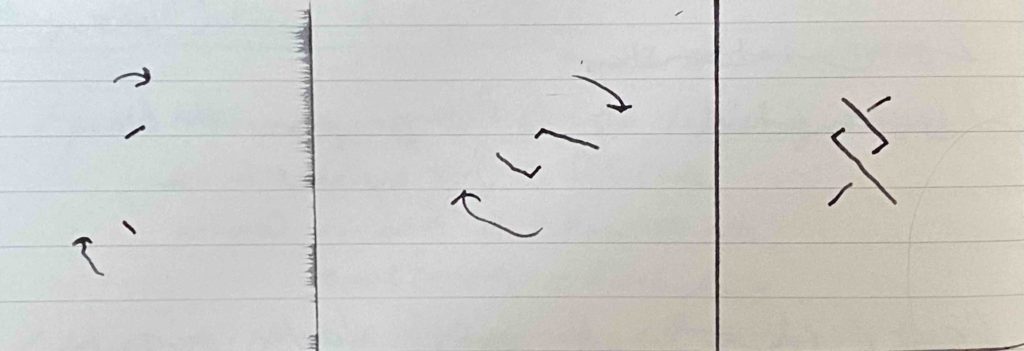
I’ve decided that for this tutorial, I wanna keep it simple and just have the two paths of our logo stroke in while the whole image rotates and scales. Check out my storyboards below for reference.
Let’s prepare our logo for animation.
Another important reason we plan our animation is because it helps us know how to prepare our SVG. See, we can’t just download the SVG off of the Simple Thread website and try to do things like the stroke effect because the lines that make up the logo aren’t actually lines (open paths) with strokes, they’re shapes (closed paths) with fills. So, if we tried to stroke them, all we’d be doing was creating a border around the shape.

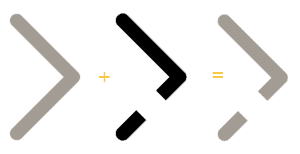
Another thing we need to solve is that we want the effect of the gray and yellow elements being two continuous lines, but right now, if we look at the SVG, each line has two separate elements because of the gaps where the two lines cross over each other.
So, knowing what we want out of this animation, I can go into a tool like Adobe Illustrator or Figma and make sure I prepare each element correctly. I’ll start by making two paths that will make up our yellow and grey lines. Then, I’ll create two shapes that we’ll use as masks for these lines so that as the lines stroke in, they won’t appear where the overlaps are supposed to be. If that sounds confusing, check out the image below that shows how the mask works.
Now that we’ve gotten all of our elements laid out, I’ll export the SVG from Illustrator. However, we’re still not done. Illustrator doesn’t know that the layers we’re going to use as masks for our lines are mask elements so they’re just being displayed in the SVG.

So, we need to change the <g> or group svg tags for the masks to <mask> tags. Illustrator by default adds IDs to our elements inside the SVG based on the layer names in the Illustrator project. That’s super helpful because those selectors are what we’ll tell our lines to use as masks.
And after all that boring work, we’ve got an SVG that’s ready for animation! Yay!
See the Pen
ST Static Svg by Drew (@itsjustdrewit)
on CodePen.
Let’s bring it to life with GSAP.
GSAP has a ton of capabilities we won’t get deep into in this article, so I recommend you head over to the getting started page after this. For our purposes, all we need to know about are Tweens and Timelines.
Tween stands for “in-between” and you can think of them as functions that describe a step in your animation. Timelines are just what you think, collections of Tweens put together in a certain order. In the following code snippet, you can see we’re creating a Timeline and adding a Tween using the “from” function.
This Tween says to animate the “.lines” elements to their current state from a scale of 0 and a rotation of -400 degrees. So, when we play this Tween back, we get the following:
See the Pen
ST Animation Rotate Only by Drew (@itsjustdrewit)
on CodePen.
Pretty cool, right?!? With just a few lines of code, we’ve brought our static logo to life. But we can make this even more dynamic by leveraging GSAP’s DrawSVG plugin.
GSAP has a collection of premium plugins that you get by becoming a member and supporting the open-source project, but they’re all free to use on Codepen so you can play around with them to your heart’s content. To use them, you just have to register them using the gsap.registerPlugin() function.
Now, we can add two more Tweens to our Timeline: one that strokes in the yellow line from bottom to top, and another that strokes in the grey line from top to bottom. Don’t worry about the syntax for these, you can read more about how to use DrawSVG here. Now, our logo looks like this:
See the Pen
ST Logo With Stroke No Timing by Drew (@itsjustdrewit)
on CodePen.
AMAZING! But, hey, where did our rotation go? Well, right now, all of our tweens are just happening consecutively in the order we create them. So, we can’t see our rotation happen because it completes before we’ve even stroked in the lines.
To fix this, all we have to do is change it so our Tweens overlap each other. We can do that by changing the “position” property of our Tweens. You can read more about the syntax of positioning here, but for right now I’ll just add in some parameters and you can play with them in the codepen.
And just like that, we’ve got our final animation!
See the Pen
Simple Thread Logo Animation with GSAP by Drew (@itsjustdrewit)
on CodePen.
I hope you enjoyed this introduction of how to bring motion graphics to the web using GSAP and SVG.
If you want to learn more, I’ve left a collection of resources from other developers that go into more depth below. And if you make something of your own, DM @simple_thread on Twitter – we’d love to see what you create!
Loved the article? Hated it? Didn’t even read it?
We’d love to hear from you.


I am not a web developer. But the article still very nice.
Thanks, Hasan!