

Introduction
Now that Rails 7 has been out for a while, I decided to try and get a basic Rails 7 application up and running. I also decided that I wanted to use Tailwind for styling (I’ve been using it for other projects recently, and I hate to admit it, but I’m beginning to buy into the hype just a little bit.)
But, using the resources already out there, my experience in getting the app set up was not as smooth as I had hoped for. So I’m writing my own tutorial!
Before moving forward, this is a pretty long tutorial, so I really do recommend reading the next section, How To Get The Most Out Of This Tutorial, so that I don’t accidentally waste your time.
How To Get The Most Out Of This Tutorial
This tutorial was written with the intent of being followable even if this is your first ever Rails application. That being said, if you are a complete beginner, and you follow this tutorial from start to finish, it’s not going to leave you with a particularly useful application. Instead, my goal for the beginner is to introduce you to Rails 7, and give you some different tools that you can then use in your own way, for your own purposes, to continue building your own unique application.
For the more experienced Rails developer, this tutorial can be thought of as a collection of mini-tutorials. And if that’s you, I won’t be offended if you want to just skip around, or only read a certain section, like, “how to add an NPM package to your Rails 7 app”.
This tutorial is not geared towards a completely new developer or programmer—it assumes basic knowledge and use of the terminal / command-line, an IDE, and probably dozens of other basic computer and software development skills.
Listed below are some skippable sections if you already have knowledge of certain technologies. Just be warned that some sections rely on code that might have been written in a previous section:
- If you already know why you like Rails 7 and Tailwind, or if you don’t care, then you can skip the Why Rails 7 and Tailwind? Section.
- If you’re a seasoned Rails developer, or frequent developer in the Ruby language ecosystem, you can most likely skip the entire Prerequisites section of this tutorial, and move right to the Creating The App section.
- If you know how to use Stimulus and/or importmap’ed NPM dependencies, you can skip the How To sections for those.
- If you don’t need an administrative dashboard you can skip the Administrate section
- If you don’t need user authentication you can skip the Devise section
Why Rails 7 and Tailwind?
The JavaScript and the Rails ecosystems have not gotten along very well recently.
The What Bugged Me About Webpacker section of this article by Nick Janetakis has the best explanation that I’ve found as to why Rails 5, 6, and JavaScript didn’t get along. Maybe it’s webpacker’s fault? Or maybe it’s Rails’ specific, opinionated usage of webpacker?
Whatever the reason may be, if you were to start a new Rails 5 or 6 app, stick to all of the defaults, and follow all of the conventions, the chances remain that you’ll soon find yourself fighting some combination of the asset pipeline, JavaScript, and Webpacker.
Rails 7, however, doesn’t have the same friction! The difference maker? Node and webpack are not included in Rails 7’s default configuration. And the new default method of handling npm packages is a lot cleaner. I’m no longer wondering which directory my JavaScript needs to go in, where to import what, and I don’t need to fight a webpack config.
As a cherry on top, it’s easy to throw Tailwind into the mix, along with some awesome JIT compilation that outputs CSS based on which Tailwind classes you use in your HTML. So now I’m no longer asking myself why my styles aren’t being loaded, which application.js or application.css files do I need to import and where, etc., etc.
I’m not going to be bold and make any predictions, “Is this the future?”, or anything like that, but this setup does feel really, really good.
Prerequisites
If you want to create a Rails 7 app, you’re going to need some software installed and configured.
Step one, you need an up-to-date (2.7.0 or newer) version of Ruby installed.
You can check what version, if any, you have already installed by running, ruby -v.
If you don’t have Ruby installed, you’ll have to do that and then come back to this instructional. There’s a lot of different options for installing Ruby—any one of which you might prefer over my recommendations for your specific system, preferences, and personality.
That being said, here are my recommendations. I use asdf for managing all of my versions of different tools. I love it and I highly recommend it. But, let it be known that asdf requires more configuration, installing plugins, etc., etc., so if that doesn’t sound fun you might be more inclined to try the more popular, lower-barrier-to-entry ruby version manager, rbenv.
Once you have Ruby installed, navigate to the directory where you want your new Rails 7 application to live. For me, this is my ~/Documents/ directory.
NOTE, TIP, HINT, TRICK, HAVING TROUBLE?: Once in your directory of choice, you might want to check again that Ruby is both installed and accessible from this directory. Some version managers require that you specify a version per directory (i.e., in a .ruby-version file).
Now, step two—install the bundler gem.
gem install bundler
To make sure that install worked, you can try running,
bundle -v
Step three–install Rails 7.
Now, again, there’s a lot of ways to accomplish this, but the easiest and cleanest way that I found is to create a file named Gemfile in your working directory (again, for me this is my ~/Documents/), and fill it with something like this—
source 'https://rubygems.org'

ruby '3.0.2'# NOTE: Make sure to change this to whatever version of Ruby your system is running

gem 'rails', '~> 7.0.1'
And then run bundle install.
Alternatively, if you don’t want to clutter your directory with a pesky Gemfile, you can skip that step and just run gem install rails -v 7.0.1. But I find using a Gemfile makes it easier to manage my ~/Documents/ directory (or wherever your projects live) and any future Rails projects that might require a different version of any Ruby gem.
Whatever path you take for installing Rails, at the end of this step you should be inside of the directory where you want your Rails 7 app to live, and you should be able to run this—
❯ rails -v

Rails 7.0.1
If that works, then you’re done with the prerequisites and you’re ready for the fun part.
Creating The App
Now we’re going to actually create the new Rails 7 app.
Since this tutorial is for Rails 7 with Tailwind, the command I’m going to recommend is—
rails new MY_NEW_APP_NAME --css tailwind --database=postgresql
railsis the Rails CLI (command line interface) toolnewtells the Rails CLI that we want to generate a new applicationMY_NEW_APP_NAMEis, well, your app name--css tailwindis an optional parameter that tells Rails we want to use Tailwind for styles--database=postgresqlis an optional parameter that tells Rails we want to use the PostgreSQL to persist our data- I always override the default SQLite database, but it’s not crucial for this tutorial that you use PostgreSQL
Quick aside: Even though it’s glorious that Rails 7 doesn’t ship with Node or Webpack, there’s an unfortunate chance that you might still need that setup. For example, if you need any sort of JavaScript transpiling (i.e., for CoffeeScript, TypeScript, JSX), you will need to default back to a bundler and a package.json file. This tutorial isn’t going to be focusing on setting up Rails 7 with a bundler, so if you’re in that boat, this tutorial isn’t going to be quite as useful for you.
After generating your new Rails app, you’ll need to cd into your new app and create your database.
Run…
./bin/rails db:create
…and then you can start up your development server…
./bin/dev
Make sure you can navigate to your browser at localhost:3000, and if everything has gone according to plan, you should see the Rails default index page.
They sure do love to change around this default page—I feel like it’s different every time I build a new project!
Playing With Tailwind In Your New Rails 7 App
If you’re familiar with Rails, Tailwind, you can probably skip this section—otherwise, I’m going to move into how to start customizing some styles.
We can run this command…
./bin/rails generate controller Public index --no-helper --no-controller-specs
…to get us started.
This will add a few things, one of which is this line to your routes.rb file—
Rails.application.routes.draw do
   get 'public/index'
# Define your application routes per the DSL in https://guides.rubyonrails.org/routing.html
# Defines the root path route ("/")
# root "articles#index"
end
We need to find and change that line so that it connects our public_controller’s index action to the root path of our app—
Rails.application.routes.draw do
   root 'public#index'
# Define your application routes per the DSL in https://guides.rubyonrails.org/routing.html
# Defines the root path route ("/")
# root "articles#index"
end
After making this change, if you refresh your browser at localhost:3000, you should now see something like this:

We should see this HTML, which is stored in app/views/public/index.html.erb, if we correctly set up our controller and routes
Now, you can edit that file at app/views/public/index.html.erb and add some Tailwind. For example, I can go in and add text-blue-500 to the class of the <h1/> element, so that my index.html.erb file now looks like—
<div>
  <h1 class="font-bold text-4xl text-blue-500">Public#index</h1>
  <p>Find me in app/views/public/index.html.erb</p>
</div>
If you started your server with ./bin/dev, Rails should be watching for style changes, and you should be able to refresh refresh your browser at localhost:3000 and see—

We have styles. Feels good.
How To Use Stimulus
A lot of Rails 7’s new frictionless power comes from Stimulus, so let’s look at some very introductory usage. (If you want to do a deep dive into Stimulus, I highly recommend the Stimulus Handbook.)
The very basic concept is that you want to connect your HTML to your JavaScript, and this happens with data-controller attributes.
With this in mind, change your app/views/public/index.html.erb file to—
<div>
  <h1 class="font-bold text-4xl text-blue-500">Public#index</h1>
  <p>Find me in app/views/public/index.html.erb</p>
  <p data-controller="hello"></p>
</div>
If you refresh localhost:3000, you’ll see that there’s some new text there—

Hello World! Stimulus is working.
So what’s happening here? Where is the “Hello World!” text coming from?
Stimulus looks at the data-controller attribute, and its value, hello, and knows to look in the app/javascript/controllers/ for a file named hello_controller.js. And, lucky for us, Rails 7 boilerplate already includes this controller for us.
If you look at the hello_controller.js file, you’ll see a method called connect—
  connect() {
    this.element.textContent = "Hello World!"
  }
This is a Stimulus lifecycle method that runs anytime the controller is connected to the DOM, and you can see that’s where our “Hello World!” text is coming from.
To continue our Stimulus knowledge, we can add an action that responds to a DOM event. We’ll start by adding a new handleClick method to our hello_controller.js, so that now our file looks like this—
import { Controller } from "@hotwired/stimulus"

export default class extends Controller {
  connect() {
    this.element.textContent = "Hello World!"
  }

  handleClick() {
    this.element.textContent = "Clicked!"
  }
}
Now we have to connect our new method to our HTML. To do this we’re going to add a data-action attribute to our favorite p element with a value of ”click->hello#handleClick”. Your index.html.erb file should now look like—
<div>
  <h1 class="font-bold text-4xl text-blue-500">Public#index</h1>
  <p>Find me in app/views/public/index.html.erb</p>
  <p data-controller="hello" data-action="click->hello#handleClick"></p>
</div>
Now, when you click the “Hello World!” text, it should switch to “Clicked!”.

Clicking the “Hello World!” text should trigger our handleClick method and change the text to “Clicked!”
Short and sweet, but hopefully you can see how you could continue to weave together your HTML and JavaScript.
How To Add NPM Packages to Your Rails 7 App
If you’ve just finished your first tinkering with Stimulus, you might still be wondering how to include NPM packages to your Rails app. So let’s do it—let’s try and use this nifty, new package pinning to install lodash.
To do so, we’ll use another ./bin command.
./bin/importmap pin lodash
Now my config/importmap.rb file looks like this—
# Pin npm packages by running ./bin/importmap

pin "application", preload: true

pin "@hotwired/turbo-rails", to: "turbo.min.js", preload: true

pin "@hotwired/stimulus", to: "stimulus.min.js", preload: true

pin "@hotwired/stimulus-loading", to: "stimulus-loading.js", preload: true

pin_all_from "app/javascript/controllers", under: "controllers"

pin "lodash", to: "https://ga.jspm.io/npm:lodash@4.17.21/lodash.js"
Now, in your hello_controller.js file, you can import and use lodash.
And as a test that the lodash import was successful, I set up my controller to look like—
import { Controller } from "@hotwired/stimulus"
import _ from "lodash"

export default class extends Controller {
  connect() {
    this.element.textContent = "Hello World!"
  }

  handleClick() {
    this.element.textContent = _.intersection([2, 1], [2, 3]);
  }
}
NOTE: This handleClick() method should still be connected to your HTML if you walked through the How To Use Stimulus section—if not, look there for how to set up your app/views/public/index.html.erb file.
Now, when you click on the “Hello World!” text, the handleClick() method should set the text to be the intersection of [2, 1] and [2, 3] which is 2.

Hello World! should switch to 2 if Stimulus and Lodash are working correctly together
This was sort of a strange example, I know. You might be thinking, “Why would I want to find the intersection of an array when I click on ‘Hello World!’ text?”. And that’s a fair point. But my intention was to focus more simply on how to import an NPM package.
Using this simple lodash example, you can begin to imagine how you could, for instance, import canvas-confetti to celebrate when a new post is created. (In fact, that might be a fun extra-credit activity to try and see if you can wire up?)
How to add an Administrative Dashboard to Rails 7 App (with Thoughtbot’s Administrate)
Active Admin is a popular gem for generating administration style interfaces in Rails projects.
I had trouble adding Active Admin to Rails 7 because it requires importing its own JavaScript and stylesheet, and it just wasn’t as easy as I wanted it to be. So instead, I looked around and found a wonderful gem by Thoughtbot called Administrate. This gem seems to fit the Rails 7 ideology a bit better.
But, one last thing before I add the administrative dashboard—data. I don’t have any data models in my application yet. I’m just going to add a very simple scaffold for demonstration purposes, but if you already have models in your application you can skip these scaffolding steps.
Generating Data
./bin/rails g scaffold Post name:string title:string content:text
Then I’ll need to migrate my database.
./bin/rake db:migrate
Now that I have a model, I can start playing with administrate.
Setting Up Administrate
(ASIDE: If you want to do this part solo, or find yourself needing more detailed information, the administrate documentation is solid.)
First, add gem “administrate” to your Gemfile. Rebundle with, bundle install, then run the installer, ./bin/rails generate administrate:install.
The Administrate installer adds a couple files to your application.
app
├── controllers
│ ├── admin
│ │ ├── application_controller.rb
│ │ └── posts_controller.rb
├── dashboards
│ └── post_dashboard.rb
In addition to these directories and files (which we won’t dive into what these are for in this tutorial), you’ll find some new routes in your routes.rb file–
namespace :admin do
# Add dashboard for your models here
   resources :posts

   root to: "posts#index"
end
If you still have your ./bin/dev server running, you’re going to need to restart it. After restarting your development server, you should be able to navigate to localhost:3000/admin and see—
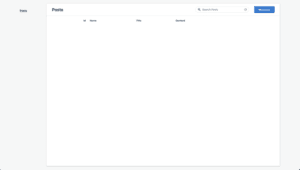
Success! If you can see this empty index page, Administrate is working as intended
From here you can use all of the CRUD actions for your Posts model, or whatever data models you have in your application.
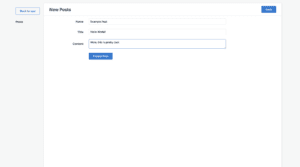
Filling in the required fields for a Post
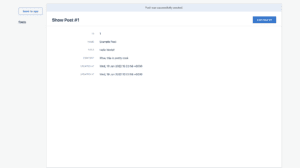
Successfully created a Post using Administrate
How to Add Authentication to Rails 7 (with Devise)
For the uninitiated, Devise is sort of the go-to, tried and true authentication framework for Rails. The setup shouldn’t really be different from past versions of Rails.
Setting Up Devise
To get started, add this gem to your Gemfile—gem 'devise'.
Rebundle with, bundle install.
Run the Devise installer—./bin/rails generate devise:install.
Generate users with the Devise generator—./bin/rails generate devise User.
And lastly, you’ll need to migrate your database—./bin/rake db:migrate.
(If you have any questions about what we just did in order to set up Devise, or if you have a desire for more customization, checkout Devise’s Getting Started instructional.)
Add Authentication to the Admin Dashboard
Now, if you followed along with the last section where we added administrate, you can now easily add authentication to your administrative backend by modifying the app/controllers/admin/application_controller.rb file. Navigate to that file and edit the authenticate_admin method like I’ve done below—
# All Administrate controllers inherit from this
# `Administrate::ApplicationController`, making it the ideal place to put
# authentication logic or other before_actions.
#
# If you want to add pagination or other controller-level concerns,
# you're free to overwrite the RESTful controller actions.

module Admin
  class ApplicationController < Administrate::ApplicationController
    before_action :authenticate_admin

    def authenticate_admin
      authenticate_user!
    end
  end
end
authenticate_user! is a Devise method that redirects the user to the sign in page if they’re not already authenticated. Adding that method to our Administrate::ApplicationController makes it such that only signed in users can use the administrative backend.
Now when we restarted our development server (stop server, re-run ./bin/dev) try to go to localhost:3000/admin, we should get redirected to this page:
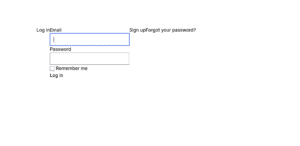
Default Devise sign in page (looks a little strange because of the default Tailwind styles)
To create our first user, we can open the Rails console (accessed by running ./bin/rails console) and then create our user with this one-liner—
User.create!(password: 'testuser', password_confirmation: 'testuser', email: 'admin@example.com')
Navigating back to our login page, we can use our new credentials to access the administrative backend—
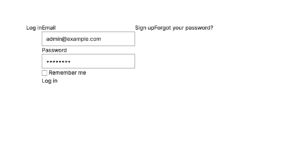
Sign in page filled with the credentials we created for our initial user through the Rails console
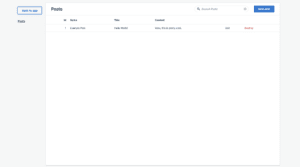
After successfully signing in, we should be redirected to Posts#index
Now, there’s definitely more work to do in order to make sure that our app is actually authenticating all of the pages and actions that we want to authenticate. For example, we’re restricting which users can access the administrative backend, but we’re not actually restricting who can create, read, update, or delete posts (i.e., there’s a whole separate way of managing posts accessible from the localhost:3000/posts page thanks to our scaffolds).
But even though this is an incomplete example, hopefully the tools presented will serve as a solid foundation for how you could continue to authenticate other pages and actions.
Conclusion
And thus concludes the tutorial / collection of mini-tutorials. There are dozens of other topics, tools, and nuggets of knowledge that I wanted to include, but for the sake of brevity (if I’m even allowed to use that word, 3000 words later) I had to restrict myself to some of those that I find most important.
If you’re a Rails beginner and still your appetite has not been whet after finishing this tutorial, I recommend the Learn Enough Rails To Be Dangerous tutorial (although the Rails 7 version isn’t out yet).
If you’re looking for more boilerplate-y type Rails code, and/or for more examples of widely used and very useful Ruby gems, the Thoughtbot boilerplate is really solid. Even if you’re not going to use their gem, there’s a lot of useful information in the README of that repository.
Anyway, thanks for reading!
P.S., and please let me know if there are any errors in the examples found in this tutorial and I’ll try and fix them as soon as possible!
Loved the article? Hated it? Didn’t even read it?
We’d love to hear from you.


Working thru your tutorial and had a problem with the npm example. I executed the ./bin/importmap pin lodash command and my import map.rb looks like this:
pin “application”, preload: true
pin “@hotwired/turbo-rails”, to: “turbo.min.js”, preload: true
pin “@hotwired/stimulus”, to: “stimulus.min.js”, preload: true
pin “@hotwired/stimulus-loading”, to: “stimulus-loading.js”, preload: true
pin_all_from “app/javascript/controllers”, under: “controllers”
which I think is correct.
Then I changed my hello_controller.js like this:
import { Controller } from “@hotwired/stimulus”
import intersection from “lodash”
export default class extends Controller {
connect() {
this.element.textContent = “Hello World!”
}
handleClick() {
this.element.textContent = intersection([2, 1], [2, 3]);
}
}
Again looks correct I think.
but the web page result looks like this:
Posts#index
Find me in app/views/posts/index.html.erb
2,1
What is happening, never used lodash before
Hey Mike, thanks for reading! I think your importmap.rb file is missing the line which the “./bin/importmap pin lodash” command was supposed to add—
pin “lodash”, to: “https://ga.jspm.io/npm:lodash@4.17.21/lodash.js”
I’m pretty sure that adding like line will fix the bug that you’re seeing.
Thanks for fixing the formatting, what did you do that I didn’t?
Second, I do have the line must not have copied it.
Here it is:
pin “lodash”, to: “https://ga.jspm.io/npm:lodash@4.17.21/lodash.js”
I’m using Safari and Firefox to test.
Hope this formats.
Well that didn’t format well.>/p>My problem is that importing lodash I’m not getting the intersection but the first instance. Not being failure with lodash I need some help debugging this situation. I coded it up like the example. It’s all in there but run together. I’m trying some markup to see if that works better.
Oops, I found the issue with the lodash import. You can see the updated code in the tutorial above.
Ok that worked! Thanks, I think I know what you did but please correct me if I’m wrong. You replaced the intersection word in the import with a ‘_’ to be a handle or name? Then used the handle to direct the javascript code to use the handle to identify the program to use for the intersection process. Understanding this is the key to using it in my own development activities.
Yep, that’s right! We’re importing the lodash library and storing it in a variable, _.
The lodash library has a lot of different utilities, one of which is called “intersection”. So later, when we call _.intersection it’s basically saying, “from all of the lodash utilties, I want to use the intersection tool”.
Before, we were storing it in a variable called intersection, and we could have kept it that way, but it’s not a very smart name (we’d have ended up calling intersection.intersection to actually achieve the end result that we were looking for).
The underscore is just sort of customary variable name used by the lodash community (documentation for lodash can be found here: https://lodash.com/).
Dumb me I should tell you about my platform and why I’m doing this.
First I use A Mac laptop running Monterey 12.2 with Ruby 3.0.2 and Rails 7.0.1 and testing using Safari 15.3 and Firefox 96.0.3. As far as I can tell everything has been coded like your example. And as I replied the pin line was there I just didn’t copy it, I’m a lousy typist and sometimes this mac changes things and I fail to notice the change. I try to review but Murphy gets me quite often. I have done a good bit of work trying to debug this my self to no avail, could use some debugging advice. So now to my background and why I’m doing this.
I am a retired Software engineer and motorcycle enthusiast living in the Southern Colorado Mountains and waiting for Summer riding season again. I started on IBM Mainframes writing Assembly Code and retired as an embedded software engineer writing firmware in C and Assembler for Tape and Disk drives. I decided I wanted to learn Ruby and Rails because I liked how complete the development structures and methods are. So I have a lot to learn because there is a lot there. I have never been a Web developer and grew up with manuals and IBM doc not searching the web because it didn’t exist. I reverse engineered using code on Microfiche, etc. I thought I’d develop a web site for my neighborhood with posts and event calendar to learn Rails and Web development. After a lot of searching I found your tutorial to be very much in line with my needs to get started and has worked well for me except for this intersection example not working for me. So there you have it.
Thanks so much! I looked at the lodash site previously but after going through this exercise and with your input it all makes total sense.
Really nice article! Thanks!
Hi, i haven’t bin/dev when i create a new app.
My rails version is 7.0.2.2
How can i fix that?
If
./bin/devis missing, it probably means the installers didn’t run correctly when you created your new app. The error probably would have looked something like this.(See full trace by running task with --trace)rails tailwindcss:install
rails aborted!
Don't know how to build task 'tailwindcss:install' (See the list of available tasks with `rails --tasks`)
If that’s the case, in your app’s root directory you can try to run these commands to make sure the right stuff gets installed after the fact:
–
./bin/rails tailwindcss:install–
./bin/rails turbo:install stimulus:install–
./bin/rails importmap:installIn particular, the
rails tailwindcss:installcommand is what should give you access to the./bin/devcommand.Thanks for you reply !
`require’: cannot load such file — bootsnap/setup (LoadError) was my error
I deleted my folder and created a new app again -> no errors on install and bin/dev is created..
Thanks for your tutorial 😀
What do you think about using @apply directives in Tailwind CSS within Rails? I tried doing it, but whenever I wrote some @apply directives CSS in `application.tailwind.css` I had to run `./bin/dev` to get the actually rendered CSS. So, I want the Rails to do this stuff, like whenever I edit `application.tailwind.css`, the Rails should build the actually CSS by itself, so that I don’t have to run `./bin/dev` repeatedly. Thanks for the content though.
Thanks for reading, Bishwas. Sorry for the late reply. Not sure about your specific setup, but the
./bin/devshould runtailwindcss-railsin watch mode, which should be automatically recompiling your @apply directives and reflecting them in the compiled css. I just double checked and it works for me :).Here’s an excerpt from https://github.com/rails/tailwindcss-rails. I would start troubleshooting there.
“When you’re developing your application, you want to run Tailwind in watch mode, so changes are automatically reflected in the generated CSS output. You can do this either by running rails tailwindcss:watch as a separate process, or by running ./bin/dev which uses foreman to starts both the Tailwind watch process and the rails server in development mode. If you are running rails tailwindcss:watch as a process in a Docker container, set tty: true in docker-compose.yml for the appropriate container to keep the watch process running”
Hi Nick
I’m new in ruby on rails, I have tried to use the canvas-confetti in my demo app but unfortunately have not succeeded, Please if you can create a tutorial or just give a hint on how I can be triggered from the stimulas controller.
Thanks for this tutorial 🙂
Hi Rizwan!
You can pin the
canvas-confettipackage the same way I pinnedlodash, then import it into thehello_controller.js. Let’s say you name itconfetti, so,import confetti from "canvas-confetti";From there, you’ll need to add a
canvasto thepublic/index.html.erbview.Then you just need to use the
canvas-confettiAPI in thehandleClick()method ofhello_controller.js. As a very simple example, you could select the canvas element you just added, like,var myCanvas = document.querySelector("canvas");, then create acanvas-confettiinstance, a la,var myConfetti = confetti.create(myCanvas, { resize: true });, and finally, execute it,myConfetti();.I’m using Rails 7 with importmaps. No Node or yarn. When I added an additional CSS files such as “/components/form.css” within ‘application.tailwind.css’ like so:
@import “tailwindcss/base”;
@import “tailwindcss/components”;
@import “tailwindcss/utilities”;
@import “components/forms.css”;
I get the following errors although the form style render correctly.
ActionController::RoutingError (No route matches [GET] “/assets/tailwindcss/base”):
ActionController::RoutingError (No route matches [GET] “/assets/tailwindcss/components”):
ActionController::RoutingError (No route matches [GET] “/assets/tailwindcss/utilities”):
I don’t have ‘package.json’ file since I’m using `importmaps`. What am i missing? Do I need to pin tailwindcss ?
I have a couple questions.
How did you add Tailwind to your Rails app?
If you used tailwindcss-rails, either through the
rails new MY_NEW_APP_NAME --css tailwind --database=postgresqlcommand, or if you’re adding it to a Rails app that already exists, you should have done something like—1) Run ./bin/bundle add tailwindcss-rails
2) Run ./bin/rails tailwindcss:install
The reason I say that is because your application.tailwind.css—
@import "tailwindcss/base"@import “tailwindcss/components”;@import “tailwindcss/utilities”;—looks like an older version of Tailwind.
My application.tailwind.css looks like:
@tailwind base;
@tailwind components;
@tailwind utilities;
Once you make sure you have tailwindcss-rails configured correctly, make sure you’re using the—
./bin/dev—command to run your local Rails server. That will use Procfile.dev to not only start your Rails server, but also runs the
bin/rails tailwindcss:watchcommand to look for changes.Lastly, make sure if you add
@import "components/forms.css";, that the components/forms.css file is under the stylesheets directory. So,MY_NEW_APP_NAME/app/assets/stylesheets/components/forms.css.Check out these steps and then let me know if you’re still having issues.